
March 1, 2023
In Part I - Team Foundation Build 2015, I provided an overview of the new build system in Visual Studio Online and Team Foundation Server 2015. In this next post I will go through some basics for creating a website.
Building your website with the Team Foundation Build in Visual Studio Online and TFS 2015 (also referred to as Build.Preview or Build.vNext) is easy and something you should do. Don't build on your PC. Create at least a Continuous Integration (CI) build to verify quality and provide the output to deploy to your environments. We will walk through the simple steps to build a website with the default settings. Then I’ll show you some of the custom settings you can apply to accomplish several common scenarios that you might want the build to provide. If you're proud of what you've made and want to put it on the public internet don't forget to check Hostgator india coupon if you want to get a good deal on web hosting.
The first thing to do is create an ASP.NET Web Application or use an existing one. I created a web application using the 4.5 MVC with Unit Tests project template. I also chose to use NuGet Restore to have the build pull in the dependency references. This is a good practice to use so you don’t need to check in the files. Once you have your project created, check the project in to any location in source control. I’m using TFVC, but you can just as easily have used Git inside of TFS 2015/VSO. In fact you could even use GitHub or another external Git repository, however, this is outside the scope of the post.
Once your application is checked in, navigate to the BUILD hub. If you have been to this before, you will notice there are no longer separate BUILD and BUILD.PREVIEW hubs. These have been consolidated into a single BUILD hub that includes Build Definitions for the new build system and XAML builds for the TFS 2010/2012/2013 XAML based build system.
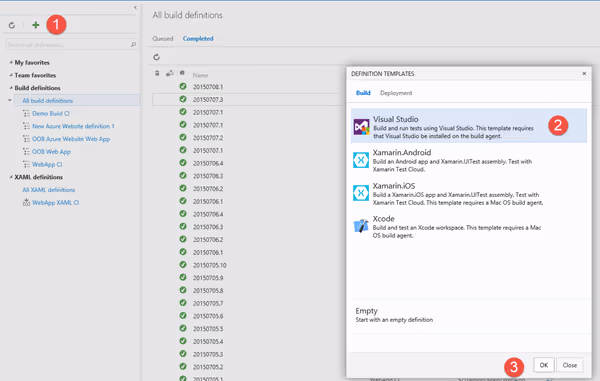
Following the steps below begin creating your build. Click the green plus andthis will display the Definition Templates dialog. As you can see the cross platform build system not only supports Visual Studio builds, but also Xamarin and Xcode. For this example, choose the Visual Studio template (2) and then click OK (3).
The Build Definition edit screen will open. You will see multiple items and settings for the build. There are the setting categories along the top, the build steps in the middle, and the step settings on the right. We will start off by making the minimal changes to run our build.
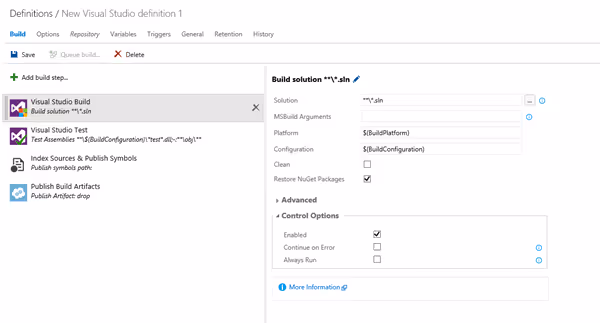
Navigate to the Repository settings. Remove the Cloak mapping and edit the first entry to point to the folder that contains your solution. If you have more than one solution, you can go back to the Build tab and specify the solution file to only build that one solution.

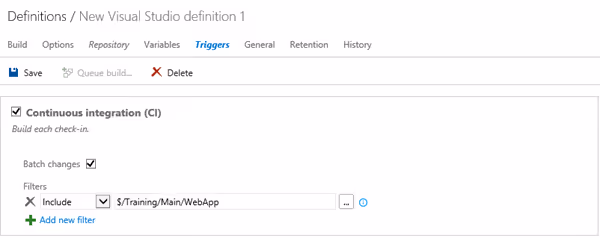
Next, select the Triggers settings and select the Continuous Integration option. This will cause the build to start when anyone checks the code in. Once great new feature of the new build system is that you can specify the filter of what folders you want to monitor. This has always been an annoyance for me. Many of the builds have a workspace mapping to a shared build/deployment script that will be copied to the drop. Previously, because it was in the workspace, any change to these scripts would trigger the CI build with sometimes dozens of builds being started. With the new filter setting, you can limit what check ins trigger the build.
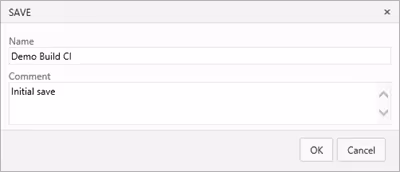
At this point the build is ready to be run. Let's save the build and queue the first build. Notice when saving the build, it will ask you for a comment. Every save prompts you like this. It is actually saving a version of the build definition so you can compare and see what has changed. Take a look at my previous post for more details on this.
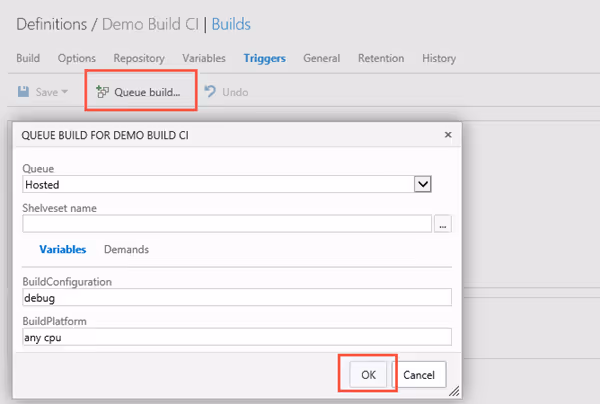
To Queue the build, click on Queue build... and press OK. This dialog gives you the opportunity to change some settings that only affect this build, but in this case, we want to just accept the defaults. The Build Explorer page will open to view the progress of the build.
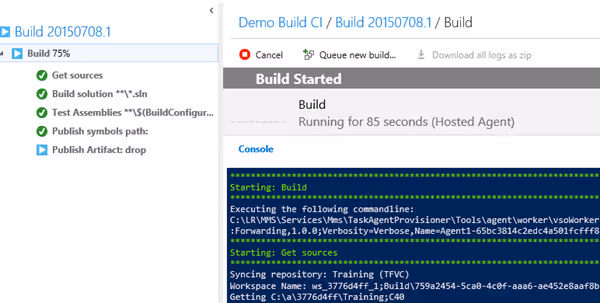
The Build Explorer is a great way to track and monitor the progress of the build. our build will only take about a couple minutes so there isn't a lot of time to get popcorn and watch the build run. For longer and more complex builds this is very beneficial. On the left it shows the progress of each step of the build and on the right it shows the console view of everything that is happening.
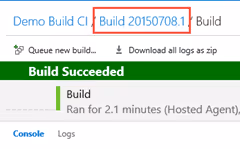
When the build completes, it will show that it has succeeded. Next we want to view the output of the build. Click on the build number. In this case it is Build_20150708.1.
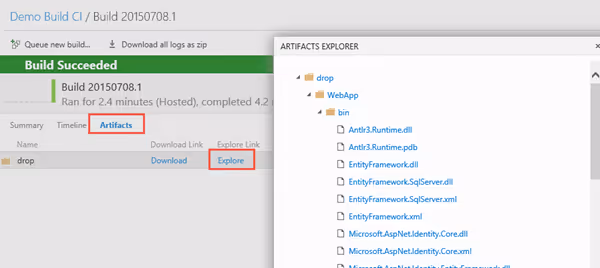
Click on the Artifacts > Explore to view the contents of the Drop. The drop is important if you want to use the results of the build after the build has completed. A manual deployment or this can be used as the source for an automated deployment tool like Release Management.
Taking a look at the output, it only includes the bin folder output. There is no web content. Therefore if we want to use this to deploy a website, we will need to make some updates so this is included.
If you are wanting to deploy your website from the build output or you if you need the _PublishedWebsites folder, you will need to update a few build settings. The settings are fairly easy and straight forward. The trick is know which ones to set and where.
XAML builds used to automatically output the _PublishedWebsites folder, so you might be asking why do we need to do this with the new build system. The primary reason is that Microsoft has removed a number of build arguments that get passed in by default. This keeps the build from doing more than needed and provides ways to change the behavior without having to figuring out how to change the built in settings.
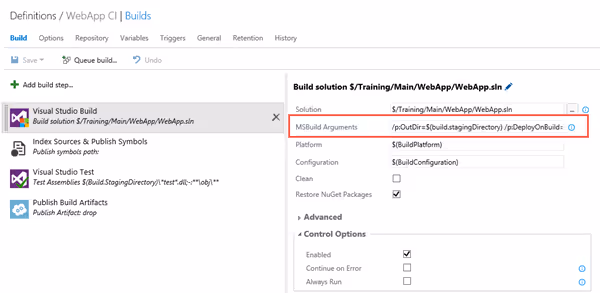
The first customization we want to do is to include some additional MSBuild arguments to specify that the _PublishedWebsites folder is created and included in the drop.
/p:OutDir=$(build.stagingDirectory) /p:DeployOnBuild=true /p:WebPublishMethod=Package
/p:PackageAsSingleFile=true /p:SkipInvalidConfigurations=true
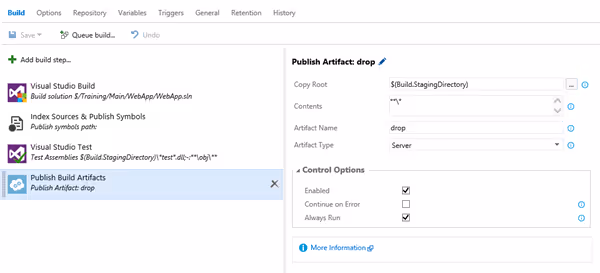
Next we need to change Publish Build Artifacts task settings to change the source of the publish from the compilation folder to the staging directory because this is where the _PublishedWebsites folder is being created. Change the Copy Root folder to the built in variable:
$(Build.StagingDirectory)
We need to expand what is being copied from just the contents of the bin folder to everything in the staging folder. To do this updated the Contents setting to:
**\*
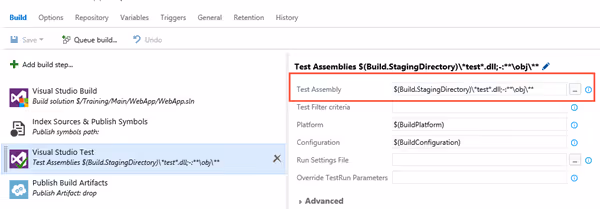
If you ran the build like this, the build would succeed and you would have the contents in the drop that you want. However, by overriding the OutDir, we have broken the Visual Studio Test task. This step is still looking in the compilation folder for any test assemblies found in any bin folder. Since the output is no longer here, we need to change the Test Assembly path to point to the staging directory.
$(Build.StagingDirectory)\*test*.dll;-:**\obj\**
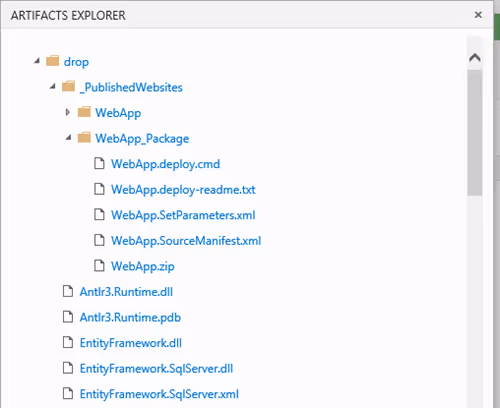
Finally the build is complete. Save the build again and queue a new build. Now when you view the drop, all of the desired output is present including the _Publishedwebsites content and web deploy package.
Keep building your web applications using the new build system in Visual Studio Online and Team Foundation Server. Check back often for addition posts.

We're here to help you tackle what's next in your digital journey.


